

DIY: Horizontal Storage of 55 gal. Water Barrels
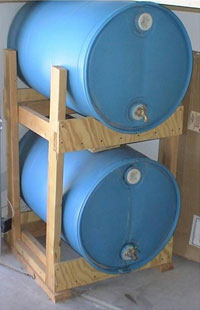
FAILURE WARNING: After two weeks two barrels started to collapse due to insufficient support. I plan to add a 2x6 or 2x8 across the middle to increase the surface area supporting the barrels. I was anxious to share this project and should have waited longer to see if my concerns about too little support were legitimate. I will re-post this article once I have a proven design. I will I stumbled across this DIY project recently for storing 55 gal. water barrels horizontally. The biggest drawback of standard upright water barrels is getting the water out when needed. This generally involves either a siphon or a hand pump. Storing the barrels horizontally and adding a spigot to one of the caps makes using the barrels much more convenient. You’ll also be more likely to exchange the water every six months since it will be easier to do. Here’s the website I found this project on and here are the instructions you’ll need (same pdf as you’ll find on the other website). Since I have 5 water barrels I decided to make a six barrel holder instead of the two barrel holder you see in the picture. This allows me to store more in less space than before and now I have an incentive to add another barrel. I’ll share the changes I made to the design and what I learned to make this project as easy as possible. Since this is basically a box, you should be able to complete this project in a few hours. For me it took a little longer because I also cleaned or rather my kids cleaned the water barrels, I had to dig through random boards to find what would fit the project and I ended up stopping before completing the project and finishing on another day. It was time to exchange the water in my barrels so this project came at a perfect time. I also had wood lying around so I was only missing the spigots. 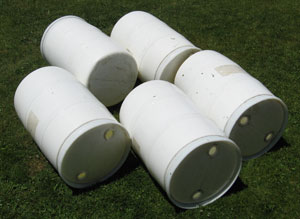 The first task was to empty the water out of the barrels using a garden hose for a siphon. I had two going at once to speed this up as it takes a little while. I let my 10 year old boy suck on the hose to start the water siphoning. I was surprised since he didn’t seem to suck very hard but the water still came. It takes a lot less suction than I imagined, even with a long hose. I let my boy clean the barrels while I gathered the tools and hunted down boards. I also read through the instructions, decided which changes I’d like to make and then calculated my board quantity and lengths for cutting. Suggestions/Changes I Made Main changes I made were to add an inch on each side of the barrels since these barrels sit outside and I wanted to allow for expansion. I also calculated the changes I would need to make this 2 barrel rack into a 6 barrel rack.
Here are the instructions you’ll need as a reference for the board letters below (same link as above).
In the diagram the boards labeled E (skids) are not necessary and you can cross them off your list. You decide whether to use boards labeled C for cross braces or use the boards labeled F. Using both is overkill. I used 2 x 6’s instead of 2 x 4’s for boards labeled A since my rack is three barrels high instead of two. I also cut the first notch in A 6” up so that I would have more room to connect a hose to the bottom barrel without kinking the hose. This also allowed me to use all 90° hose bibs (spigots) instead of using 45° angled hose bibs on the bottom barrels. To make a double wide rack as I did, just double boards B & D. OK, technically you double the length and subtract 1 1/2 inches. CAUTION: you must be more exact in your measuring and cutting out the notches in A for the cross boards B as you now are lining up three points of contact instead of just two. 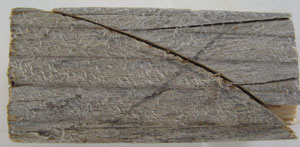 I decided to eliminate the curved plywood boards D and instead used the cutouts from A, cutting them into wedges. If I had to do this part again I would make two identical wedges by cutting straight from corner to corner of the cutout. I saw these wedges right as I was preparing to cut out the plywood and this idea worked wonderfully. I would do it this way again but it is not as finished or attractive as using the plywood boards to keep the barrels from rolling.
 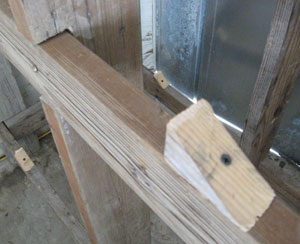 Make sure you drill a hole through the wedges first or you’ll split them with the screws. I placed the wedges about 7 1/4” from the vertical supports A but your measurement may vary depending on the shape of the wedge. Also, I widened my supports by an inch on each side of the barrels for expansion so my veritical supports A are further away. Ok, so I made lots of changes to the original design but I’m happy with the result and I now have a much more convenient and compact storage rack for my water barrels. I also have room to add one more barrel to the rack. I guess this is an example of resourcefulness as I didn’t purchase anything to build this rack. I only used what I had on hand and my only expenses will be replacing the drill bit I broke and the spigots.
 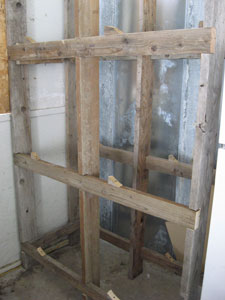 Assembly You will want a helper to hold boards in place as you screw everything together. I found it easiest to assemble the front and back sections on the ground or on a flat, level surface. Follow the order on the instructions eliminating step #6 (the skids) and do either step #5 or #7 but not both as discussed above. I didn’t encounter any difficulties in putting everything together. The only addition to the instructions would be to make sure the notches in A are facing outward and not towards the center of the rack. I used some pretty hefty 3 1/2” screws to put everything together and pre-drilled holes before screwing each of the boards together. Hose Bibs I found [3/4” Celon Hose Bibs for 20 each a few years back. They were filled with juice concentrate previously and were really a pain to wash out since you can’t get to the bottoms to scraper them out. If you have a pressure washer it might be easier. Since I saw clean, new barrles for $45 just a few weeks ago at macey’s, it is probably not worth saving a few dollars buying used barrels unless you are seriously strapped for cash.
 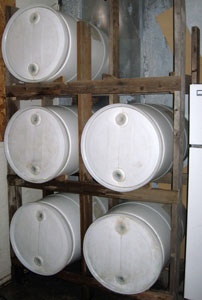 Conclusion It has been a week now since I finished this project and the rack is still standing :-) Since each filled barrel weighs about 450 lbs. this rack is holding 2,250 lbs. total. I’m very happy with how it turned out and would highly recommend this project to anyone who has 55 gallon water barrels. If you don’t have any water storage currently then consider the storage options in last month’s water storage group buy which are very convenient. If you decide to build a horizontal rack then please share your experience in the comments below.